Tuesday, December 15, 2015

Quinoa Bowls...Pass it On


When I find something great, I can't wait to pass it on!
We have a new favorite meal at our house that I have been wanting to share with you for several weeks.  These early dark dinner hours have made it really hard to capture the meal in photos in order to post it.  So, this weekend I made it for Saturday lunch so that I could get photos with natural light.

This meal, Quinoa Bowls, was generously made for our family by my friend Maureen, while Dave was out of the country several weeks ago. It was so delicious, we all devoured it.  She had gotten the idea from Lane, when they and their husbands had eaten together a while back.  So, thank you Lane and thank you Maureen for passing it along!

after meal Jenga

after meal fire in a real fire place
I wondered  if it just tasted so good because I didn't make it and it was so special to have someone cook for me and my kids, or if it was the loving company.  My mom has always said, "It's the company that seasons the meal." I believe this is true.

That being said, I have since made it for my family several times and they love it.  So I think it's a great meal regardless of whether it's with special company or just everyday family members.

It's really more of a "concept" than a recipe, as you can adapt it anyway you like to make it as simple or elaborate as you want! 
There are some WARM ELEMENTS and some COLD ELEMENTS.
The point is that you make the warm ingredients and prepare/chop the cold toppings and then set it out to pile in bowls and devour.  It's build your own bowl.

For the Warm- 
Quinoa- start with this.  If you have a rice cooker, you can use it to make your quinoa, if not, just make it on a pot on the stovetop.  Just make it according to the package.  Portion-wise: I would suggest 1 cup dry for every 4 portions.  For my family of 5, who usually returns for seconds, I usually make 2 cups dry.

Black BeansI usually open cans of black beans, rinse and drain beans.  Add a little water and season with kosher salt, cumin, garlic powder, and Cholula (or Tabasco) to taste.  Place on medium heat and stir until warm, turn heat down to low and stir occasionally. 

Kale- This is the last step of the process.  Sauté a couple of cloves of fresh garlic in a Tbsp. of olive oil in a skillet.  After a couple of minutes add roughly chopped/torn raw kale.  Stir around occasionally until kale is wilted, and soft but not mushy.  It shrinks drastically.
before

after
If you have carnivores that can't handle a meatless meal, or if you just want to add another element- We have warmed chicken sausage (sliced and browned on the skillet) to add to our bowls.  If you want to go meatless, you can forgo this! 


For the Cold-
Green Onion- thinly slice

Cilantro- wash and pluck leaves off

Feta-crumble

Limes- dice (to squeeze on top of the bowls)

Avocado-dice

Tomatoes- dice

Then just line it all up, put out a stack of deep bowls and spoons and let people pile their own creation.

The other night when we had this for dinner, we were discussing what ingredient was the "most essential" and we really couldn't decide (or agree).  We'll let you be the judge- but something about the flavor combination is just right.

(Sprinkle some salt and pepper on top- and Hot Sauce if that's your style.)

I love meals where you can make a bar and people can fix it like they wish, and I really love a meal that is comforting and nourishing and beautiful!  


Here is the line up at my house:

The Asher
The Julie

The Lainey

The Dave

The Lucy

Speaking of passing it on, and speaking of comforting, nourishing and beautiful...

Several weeks ago, I saw via Instagram that our very talented artist and designer friends, Jay and Kristi Smith, had designed and produced a spiritual/therapeutic coloring book!  I was so excited to hear about it and wanted to get a few for Christmas gifts.  I emailed Kristi to ask her the best way to purchase a few and she ended up coming by the house to bring some for me to buy.  She said she had heard about the CD, Amazing Love,  that Dave had produced for our church's 5th Anniversary and wanted to buy one.  So, they came and we made the transaction. It's beautiful and I can't wait to get my pens and pencils in it!   It is beautiful, spiritually encouraging and therapeutic!

(If you need any last minute Christmas gifts- both this album and this coloring book are lovely!)


Click here to view their blog and read about the story behind the Coloring Book.

Wishing you health, beauty and comfort this season.  

Friday, November 13, 2015

Mind Body Soul Nourishment


My mind is full of thoughts these days.  It feels like it's on overdrive sometimes.

The things I'm reading, for work and for personal growth have been rich and thought provoking. I want to underline and highlight it all and meet up to discuss every insight! It's inspiring and overwhelming! It feels like a feast.

Parenting my kids, each with unique needs and ever-changing situations, is requiring me to dig deep and get creative and think hard.  No coasting going on here, no cruise control- being fully awake is a must. It is purposeful and deep, joyous, exhausting and heart wrenching.


All the while, I'm trying to physically nourish my family and myself every day.

On busy days I am looking for fuel.  One of my go-to’s is Granola.  I try to always keep it on hand.  I love it for a power snack and it is one of my favorite breakfasts- especially with plain Greek Yogurt and fruit.  When my body feels out of whack, it’s usually because we are out of granola. 

I tried this new Granola recipe recently (though I am very loyal to my granola recipe I’ve been making for years).   I thought I would give it a go.  I got the inspiration for the recipe from My Father’s Daughter cookbook by Gwyneth Paltrow, which I checked out of the library.  She calls it "Favorite Granola" so I thought it was worth the shot.  It doesn’t have refined sugar and has substantially less oil than my regular recipe. I added and deleted a few things, but used her instructions, sweetening with real maple syrup and agave nectar.  It is really good. (After my last post of Monster Bars/Slice with gobs of sugar, chocolate chips and M & M's, it seemed like a good balance.)  Everything in moderation is a guidepost in my life. 

Here is the recipe for the Granola.
And HERE is my "standard" granola recipe.  And HERE is a Peanut butter granola recipe that I love. 

(I always double the recipe if I have enough ingredients because it freezes so well.  I leave one batch in a jar on the counter and the other in a ziplock in the freezer. ) 

2 cups whole rolled oats (Old Fashioned Oats)
½ cup whole raw almonds
¼ cup sunflower seeds
½ cup shredded coconut
¼ tsp. ground cinnamon
¼ tsp. salt
(I sprinkled a couple of tsp. Chia seed in mine too, or you can sprinkle wheat germ for some added umph!)
½ cup real Vermont maple syrup
3 Tbsp. light agave nectar
2 Tbsp. vegetable oil (or coconut oil brought to liquid temp)

½ cup Craisins and dried cherries (and/or golden raisins), roughly chopped

Preheat oven to 350 degrees.
Stir together the oats, almonds, seeds, coconut, cinnamon, and salt in a large bowl.  Combine the maple syrup, agave, and vegetable oil in a small bowl and then mix with the dry ingredients.  
Spread the granola out on a baking sheet LINED WITH PARCHMENT PAPER (I learned the hard way about the importance of this). 
Bake for 20 minutes, stirring occasionally, or until evenly browned.  Remove the pan from the oven and push the granola so it's about 1/3 inch thick, letting it cool completely and then breaking it apart into small pieces. 
Combine the cooled granola with dried fruit.  

Keeps well for several weeks in an airtight container and in a ziplock in the freezer for a few months!


And here is some mind/soul nourishment from some of my current readings:
(I highly recommend each of these books.)

From Mary Pipher’s The Shelter of Each Other about counseling with families:
 “Whatever the family is ashamed of must be discussed.  As Adreienne Rich wrote, ‘That which is unspoken becomes unspeakable.’ We are diminished by living with problems we try not to see.  Secrets keep families from dealing with reality.  They create alliances and estrangements.  They keep things from changing and make people feel ashamed.  Secrets teach people the destructive lesson that certain events cannot be handled.  For families or individuals to be healthy, they must be able to integrate all of their experiences into their lives. “
And from Brene Brown’s fabulous new book, Rising Strong about “rumbling with disappointment, expectations and resentment“, she says this:
“Here is what you need to know about disappointment: Disappointment is unmet expectation, and the more significant the expectations, the more significant the disappointment. The way to address this is to be up-front about our expectations by taking the time to reality-check what we're expecting and why.  Expectations often coast along under our radar, making themselves known only after they have bombed something we had high hopes for into rubble."
And Anne Lamott’s classic, Traveling Mercies, a section about coming to terms with her aging body.
“Over the years, my body has not gotten firmer.  Just the opposite in fact.  But when I feel fattest and flabbiest and most repulsive, I try to remember that gravity speaks; also, that no one needs that plastic-body perfection from women of age and substance.  Also, that I do not live in my thighs or in my droopy butt.  I live in joy and motion and cover-ups.  I live in the nourishment of food and the sun and the warmth of the people who love me.”
I am hoping you too can feed your body or your mind/soul on some of this, and "live in the nourishment of food and the sun and the warmth of the people who love (you)".


Saturday, October 10, 2015

Monster Slice (Oatmeal Peanut Butter Chocolate Chip M & M Cookie Bars)

Last weekend our family braved our first family camping trip. We went with our friends the Snaders (who are experienced campers)! It was a success, though I am not so great at sleeping on the ground.

I made some bar cookies for the trip and when I pulled them out for an afternoon snack at the campground, Melinda said, "Oh that reminds me of our Australian friend Rachel.  She always bakes for every occasion, including camping."  Evidently you always want Rachel at an event because she brings delicious baked goodies. I asked Melinda what all she makes and she said mostly Slices.  I asked what a slice was.  She said "Slice" is what they call "bars" in Australia.  Not plural, "Slices"- singular, "Slice".  She said she makes different types of Slice: Lemon Slice, Chocolate Slice, Raspberry Macadamia Nut, etc. So fun.

I looked up the definition when we got home and had access to Google again to see what constitutes a Slice.  (One of the refreshing parts of being in the woods was not having phone service!)

Here's what it said: Slice: (Australia, New Zealand) A class of heavy cakes or desserts made in a tray and cut out into squarish slices.

Why do words seem so much cooler when they have an international influence?

Cheers instead of Hello,
Holiday instead of Vacation,
"throw that in the bin" rather than the trash
stand in the queue rather than the line

I think I'm going to have to adopt the name "Slice" for bars.

I've been wanting to post this bar cookie recipe for some time, but needed to get some photos before I could post it.  I got it from Kathryn who kindly made these last year for her Sunday School class in honor of Lucy's birthday.  Lucy was so honored that Kathryn, her teacher, made a birthday goody and I was so happy that she shared one with me!

I asked for the recipe and held onto it, wanting to make it.  The hang up was that I never seemed to have M & M's when I wanted to try the recipe.  There is a reason for this.  I can't keep them in my house.  People snack on them and then they are gone...or at least not enough to make the recipe.  So, this summer, I bought M & M's and declared them "off limits" for sneaking.

Little did I know the recipe makes a huge amount- an entire jellyroll baking sheet!  I shared them with neighbors and we had them for several days until I froze the rest.  Since then, I have halved the recipe since, to make a more manageable size. Another bonus to this smaller batch is that you only need 1/2 cup of M & M's.  So that means in my house, there's a better chance of being able to have enough to make it.

This recipe is Gluten Free if you use Gluten-Free Oats (not all are..so watch it, if you need/want GF).
They are hearty and healthy-ish, in that they have peanut butter and oats and no flour.  But I'm not deceived...they also have butter, sugar, chocolate chips and M & M's! But most of all they are yummy, easy to make, and they travel well.

Monster Slice 
(Oatmeal Peanut Butter Chocolate Chip M & M Cookie Bars)

16-20 bars

5 ½ Tbsp. butter, room temperature
3/4 cup light brown sugar
1/2 cup white sugar
2 eggs
3/4 tsp baking soda
1/2 tsp vanilla extract
1 Tbsp.pure maple syrup
1 cup peanut butter (crunchy or creamy- I use natural peanut butter)
3 cups old fashioned oats
1/2 cup semi-sweet chocolate chips
1/4 cup M&M's candies, for topping (I like Mini M&M's)

Preheat oven to 350 degrees. Beat together the butter and sugars. Add the eggs, vanilla, syrup, and baking soda. Stir in the peanut butter. Add the oats and stir again until well combined. Mix in the chocolate chips.

Press the dough into the bottom of a 8 1/2 X 11  or 9 x 13 baking dish- depending on what you have- the bigger just will make bars a little thinner. Top with the M&M's and lightly press them into the dough. Bake for 16-17 minutes, until the bars are lightly browned and just past looking wet on top. They will not be firm, but they will set up as they cool.


Monster Cookie Bars -BIG BATCH RECIPE
Makes 32-40 bars

2/3 cup butter, room temperature
1 1/2 cups light brown sugar
1 cup white sugar
4 eggs
1 1/2 tsp. baking soda
1 tsp. vanilla extract
1 Tbsp. real maple syrup
2 cups  peanut butter (crunchy or creamy- I used natural creamy)
6 cups old fashioned oats
1 cup semi-sweet chocolate chips
1/2 cup M&M's candies, for topping (I like using the mini ones)

Preheat oven to 350 degrees. Beat together the butter and sugars. Add the eggs, vanilla, syrup, and baking soda. Stir in the peanut butter. Add the oats and stir again until well combined. Mix in the chocolate chips.

Press the dough into the bottom of a large baking sheet, or jelly roll pan. Top with the M&M's and lightly press them into the dough. Bake for 16-17 minutes, until the bars are lightly browned and just past looking wet on top. They will not be firm, but they will set up as they cool.


If you were hoping for something more seasonal, instead of Monster Slice,
maybe you should click back in my archives and find a pumpkin recipe... click HERE for my favorite Pumpkin Cake 
or HERE for Pumpkin Whoopie Pies


 or HERE for consistently delicious Pumpkin Muffins
or HERE for How-To-Roast your Pumpkin Seeds

Or if you would rather read about our Halloween Traditions and recipes, you can click HERE.

Cheers!

Friday, September 11, 2015

Always Learning, Always Changing: Recipe Edits


This post is about old recipes that I have updated/improved/tweaked since posting them originally.

When I am cooking, I like to write in the margins of the recipe things I discover as I am making the dish, noting changes/additions/subtractions that I made along the way.

I 'm not great at cooking with an electronic device as the source of my recipe. I'm a pretty messy cook (okay, a really messy cook)! I don't want to touch screens or buttons or have my screen go to sleep while my hands are sticky, so I usually print off recipes when I am cooking from a blog or website.

Ironically, some of the recipes from this blog that I have in my notebook also have scribbles on them from the time since I posted them.

Even though they are tested, tweaked and approved before I post them, I sometimes alter things after the fact.  I love getting feedback from people about recipes and new ideas of how they altered them. I have often tried changes people have suggested.

I decided that I needed to tell you some changes I've made, rather than sneaking in and changing the recipes on the past blogs without alerting you (and thereby confusing those of you who have made them before). 

So here are some of my updates, improvements and changes from previous posts.  
This is still my favorite sugar cookie recipe and so many friends have told me that they make these too.  So fun, that my mom's tradition that she started could be passed down far and wide.

My long-term challenge with these cookies has been that they spread so much! This is especially a problem when you are cutting them into detailed shapes.  The shapes tend to spread to the point of unidentified objects!  Which, of course, defeats the purpose of cut out cookies!  My mom looked up a shortbread recipe one day and noticed that the absence of baking powder was the main difference between the recipe and her sugar cookie recipe.  It makes sense that baking powder would change the spreading of the cookie- that's its main job.  So, since this discovery, I have dialed it back from 4 tsp. of baking powder to 1 tsp. baking powder in my "Timeless Sugar Cookie" Recipe.  It makes a pretty major difference in the spreading.  They have the same taste and texture as before, they just keep their shape much better. 

2. Banana Muffins 


These are a staple in my home for breakfast treats and to take for breakfast events.  They are so easy and are made with things you most likely have on hand.  They are a good use for dying bananas and do not even require an egg! My college roommate, Karin, told me that she likes this recipe and uses it but cuts the sugar.  I thought…"Cut the sugar? Why would you ever do that? :) "  But I tried it, and she's right- especially if you are going to add mini chocolate chips or sprinkle the tops with sugar before baking. :)  I think the flavor of the other ingredients really comes out when there is 1/4 cup less sugar.  Who knew? Thanks, Karin!  So rather than 3/4 cup sugar, I do 1/2 cup.  

3. Baked Potato Soup

This is my son's most requested soup.  One day when I was making it, I thought, "really does it need a STICK of butter??" and I gave it a try with 1/2 a stick (4 Tbsp.) and it was just as rich and creamy and tasty!  I have a hard time with a stick of butter in soup! I mean, in cookies, yes, 2 sticks most of the time, but in soup, I try to lighten it up if I can without compromising taste or texture.  Certainly, this one fairs well with that reduction. Also, you can take or leave the sour cream depending on how creamy and dairy-ish you want it.  My husband says, "Yes" and "Always" to including sour cream in all things, but sometimes I think it makes it more thick and creamy than necessary.  So, in summary, my changes are cut the butter in half to 4 Tbsp. and take/leave/or reduce the sour cream.

4. Key Lime Pie 

This is a our family's favorite pie.  It's just so good.  My challenge with it has been the size of pan and amount of filling.  In the original recipe I posted I gave two sizes- a traditional pie pan and a deep dish. Well, this summer I tried to make the standard size and the 1/2 recipe of the filling was not enough at all.  I ended up tripling the filling and putting it in 2 crusts...meaning it really needs 1 1/2 batches of the filling for a traditional pie plate.  So, my conclusion is, use a deep dish and the large batch of filling unless you have a much smaller pie pan (diameter wise) like an aluminum pan.

5. Tea Cakes 


I made Tea Cakes recently for an event.  I always love them more than I remember!  Sometimes I forget about them and then when they resurface and I make them, I fall in love all over again.  They keep longer than sugar cookies and they are less work, but just as lovely.  When I made them this summer, they just didn't stay puffed up as high as I like them.  I texted my friend, Melissa B.(when she makes them they always look perfect).  She said she rolls them in small balls and that helps keep the roundness. I had rolled mine out with a rolling pin and cut them with a biscuit cutter. They turned out bigger and flatter.  So, though in the blog post I said "roll and cut out or roll into balls", based on my experience, I will now say roll them into balls!

6. Popcorn and Kettle Corn 

We make stove-top popcorn most every week in our house (sometimes for family movie night on the weekends and sometimes for our Snack dinner on Sunday nights).  Several months ago someone at church said I should ask our friend Drew for his Kettle Corn recipe.  My kids and I are big fans of kettle corn.  I asked Drew for his recipe and he said, "there isn't really a recipe, but rather it's just a matter of adding a few Tbsp. of sugar to the oil before popping."  That simple!  So, now we sometimes make a batch of each.  For the recipe, we simply add 3 Tbsp. sugar to the oil as it is heating up and swirl it around to distribute it evenly amongst the kernels.  Make sure you salt the popped corn well, as the salty/sweet combo is what makes it so super-delicious!

I'm sure there are a dozen more recipes that I have tweaked-since-posting, but these are the main ones that have been on my mind.  I often write about making recipes your own, altering them to your liking, and getting creative! So, since I have done that and have taken your advice on making things better, I wanted to let you know.  I will update these 6 posts with these changes so that they will be "new and improved".

Keep your great suggestions coming!

Monday, August 31, 2015

Pizza!


Our family loves Pizza.  We have it almost weekly, often on Fridays. In Nashville we have quite a lot of really good places to get pizza (Desanos, Five Points, Pizza Perfect, Mellow Mushroom, City House, Mafiaozas, Bella Nashville, and more)!  We like trying different pizza, trying different toppings and styles of Pizza: thin and thick, simple, and gourmet, with egg on top, sauce-less and with major sauce.  
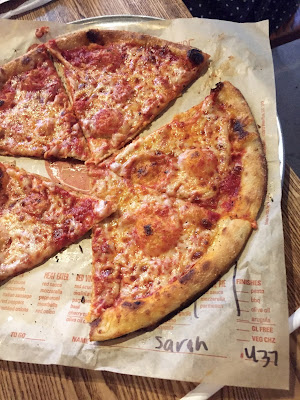
One of the newest pizza shops in Nashville is Blaze Pizza.  It’s a really fun concept.  It's individual pizzas made to order on the spot.  You walk through the line, like at Subway or Chipotle, and tell them what you want on it.  You can choose one of their specialty concoctions or make your own custom pie.  They then stick it in their super-hot ovens and flash bake it. We all gobbled up our pizza and enjoyed it so much. (My only complaint is that if each person gets an entire pizza, it quickly gets expensive). 

This was Lucy's pizza, they "call out your name" when it's
 ready and my sometimes shy girl was
embarrassed at the thought of them calling out
her name?! So my mom suggested she
give them a different name, like Sarah.
Thus this pizza's "Sarah" label.  Crisis averted.


I grabbed a menu so I could get ideas for toppings.

Though I love going out for pizza, making it at home is so simple and much cheaper for a table of 5. We've been trying different dough recipes for years and tweaking our methods.

I have been contemplating writing a post about Pizza for a long while because it is one of our go-to meals.  However, I have felt reluctant to post until I found the perfect crust recipe that is fool-proof, and became an expert pizza-maker. Each time I take photos just in case this is the one! 

I have not become an expert.  However, at this point I feel like I’ve learned enough about homemade pizza, and found a recipe that works well, and made enough of it to write about it... with the disclaimer that you just have to try it and maybe try a few recipes to find the one that suits your taste.  (Much like my post about Chocolate Chip Cookies...it's hard to claim one as the "perfect" one, because what makes one perfect is a matter of personal preference!) RIGHT?

This is a recipe that I have found to be simple and consistent.  The texture and flavor are good and using the honey, bread flour and a long knead really make this a nice dough to work with and taste!

It’s easy and quick to put together. 

Here's a good basic dough recipe:

(makes 2- 12-inch pizza crusts) 
1 cup warm water
2 1/4 tsp. active dry yeast
1 Tbsp honey
2 tsp. salt
2 Tbsp. olive or canola oil
2 1/2 cups bread flour

In a large mixing bowl, stir yeast and honey into warm water.  Sit for 5-10 minutes or until bubbles form and mixture starts to foam.  

Pour in salt, oil and half of the flour and mix. If you have a stand mixer with a dough hook attachment, this is the time to use it! 

Once that flour is incorporated, start adding in the rest of the flour,  bit by bit until you get the pizza dough to the consistency you want: slightly tacky, but not sticking to your hands (you can add up to 1/2 cup more flour if you need to).  Once you reach this stage, knead for 6 minutes.   Turn the mixer on and walk away for 6 minutes.  The dough should be smooth and easy to work with.  And the bowl should be clean. 

Lightly grease the bowl and the dough so it doesn't dry out, cover with plastic wrap and let it rise in a warm place 1-2 hours.  

Preheat oven to really HOT...450 - 500 degrees!

Remove dough from the bowl and divide into 2 balls (sprinkling flour on the dough and your hands to keep it from sticking).  Let dough rest on the counter for a few minutes. 

Sprinkle a little flour (or cornmeal) on the parchment lined baking sheet or stone.

Place stretched out dough on the baking stone/sheets.  Spread to the edge of the pan- making sure it doesn't get too thin and tear.

[My friend Karin sent me this video from her kitchen in Vermont, of her technique for stretching out the dough that was so helpful.  It's always been my frustration in pizza making. I asked her if I could attach it to the post for all to see.  She obliged.]

Par-bake the crust for a few minutes (maybe 5) so that the crust is evenly baked under the
toppings, and then pull out.
Then add sauce/toppings.
Bake for 10 minutes or until golden and bubbly.  Remove and let sit for a few minutes before slicing. 

While the dough is rising, you can prep your toppings. 

You can go for cheese and red sauce and be done or you can get creative.  


Sauce: Red Sauce, Olive Oil, Pesto, BBQ sauce

Meat of Choice (if you want): pepperoni, ham, rotisserie chicken, sausage, bacon, prosciutto, meat balls (thinly sliced) 

Cheese: mozzarella, fontina, goat, feta, white cheddar, you name it!

Veggies: don’t limit your thinking on this- thinly sliced squash, peppers, onions, banana peppers, tomatoes, sundried tomatoes, fresh spinach, artichokes, garlic, olives, capers... [Karin also suggested corn for a veggie- it's a Dominican standard. YUM.]

Fruit: not just pineapple! We had an incredible Peach pizza (with no red sauce) at Dave’s birthday dinner last month and another time we had fig on a pizza!

Finishing touches: a drizzle of balsamic reduction, or pesto,  or sauce; or shredded fresh basil, thinly sliced spinach, or sprinkle of arugula


Pizza Making Tips:
  • You can keep your yeast and bread flour in the freezer, if you don't use them often.  They will last much longer that way.   
  • If you want to make the dough to use later, place in freezer bag, removing all air from the bag before freezing.  You can freeze or refrigerate.  If frozen, remove and let sit out to get to room temperature and double in size, 6-8 hours.
  • Parchment paper is a great help when making pizza.  It makes for easy clean up and transferring pizza off of the sheet.


If you have no time to make dough (or no interest) you can make our favorite quick pizza. Simply pile great toppings on a Flour Tortilla and putting it on the skillet until its melty and golden.  Or if you are making more than a couple of them, you can put them on a baking sheet in the oven to cook multiple pizzas at the same time.  They are really yummy. Thin crust and delicious! You can make them crispy or chewy, depending on how hot and how long you cook them.

I would love to hear any ideas/tips/recipes/favorite toppings people have so that we can make it even better!  Grazie!

[Thanks to Karin for reading this post and giving me her ideas and tips.  We are better together, people]