Thursday, June 23, 2016

Mini Cinis! (Quick Mini Cinnamon Rolls)

I am a fan of cinnamon rolls!  And the smell of them in the oven is irresistible! I have always marveled that Cinnabon Cinnamon Roll shops need not market their goods, as long as they keep baking the rolls in the mall.  The smell lures people in!

As much as I love cinnamon rolls,  I often do not have the time to devote to yeast-based cinnamon roll making! So, these quick little treasures are a good stand in! They are made with canned refrigerated crescent rolls and are therefore super fast and easy while still being flaky and tasty.

I like making mini-muffins and mini versions of things so that less is wasted and people can get as much as they want (1 or 2 or 8...like my son did)! Also, when hosting a gathering, I prefer to serve minis so that guests can have a taste of a lot of different things.

There are several variations of this recipe swirling around the internet and in cookbooks- some with butter, brown sugar, and granulated sugar.  I tried this one which doesn't call for butter and they were great (since there is plenty of butteriness in the crescent rolls already). So, feel free to play around with the recipe and adapt to your liking! You can add more cinnamon or chopped nuts inside, or even orange zest. This is just the basic recipe to get you started.

Here's how to make them:

Mini Cinis
(makes about 28 itty bitty rolls)

for the rolls-
1 package (8 oz) refrigerated crescent rolls
1/2 cup brown sugar
1 heaping Tbsp. ground cinnamon

for the frosting- 
1/2 cup powdered sugar
1/2 tsp. vanilla or almond extract
A spoonful or so of milk (or enough to achieve desired consistency)

for the top-
a few pinches of coarse salt to sprinkle on top after drizzling with frosting (because salty sweet is always a win)
chopped pecans if you choose

Preheat oven to 350˚. Line baking sheet with parchment paper.

Unroll crescent roll dough onto a baking mat or another piece of parchment paper.  Separate into 4 rectangles. Firmly press diagonal perforations with your fingers to smooth them out.

Mix brown sugar and cinnamon together in a small bowl.
Sprinkle mixture evenly over rectangles- leaving a 1/2 inch margin around the edge (so that the dough can stick to itself when you roll it).
Carefully roll each rectangle into a log starting from the longer side. 
Cut each log into 1/2 thick slices.  
 Arrange mini cinnamon rolls close to one another on the baking sheet.

 Bake the mini cinnamon rolls in the preheated oven until golden, 10 to 13 minutes.  Transfer onto a plate and set aside to cool for a minute. 
Combine the confectioner's sugar, vanilla and milk in a measuring cup until smooth and a pourable (but not too thin) consistency. Drizzle over warm rolls.  Sprinkle with a little coarse salt (and pecans if you are adding those).

a double batch- minus the handful my son snagged
 This is a simple 
recipe I couldn't resist passing along to you.
Enjoy!

Thursday, June 16, 2016

Nothing Says Summertime Like Key Lime Pie (a recipe worth Re-Posting)


This is a re-post from 5 years ago.  It's a perennial favorite.  It is summertime deliciousness! 

I believe that little things can make a big difference.  It might only take a few more minutes, or a couple more dollars (or not any more $$ at all) – just a little time, creativity and intentionality, and you can greatly enhance the beauty and enjoyment of things.
For example:
>Use a pretty tablecloth or cloth napkin whenever you can (some of my favorites I got at thrift stores and antique stores).  It can add such a nice touch.

>Instead of pens rolling around in your junk drawer, why not put them in a fun jar on the table?

>On a nice evening when a friend comes by, why not light some candles outside and sit for your visit?  (It can feel magical!)

>Or keep a dish of yummy seasonal candy on your office desk to share with those who pass by.

>When you have a meeting to attend, make some cookies or muffins to take with you.

>Place a pretty napkin in a basket when serving muffins.

>Write a handwritten note of love, thanks, or well wishes to someone.

>Have a small vase of fresh flowers in the room for your spend-the-night guest.

>Sprinkle coarse sugar on top of your muffins.

>Use fresh garlic &/or herbs in place of dried when cooking.

>When hosting a gathering, make little tents out of card stock with labels of "de-caf" or "regular" on your coffee or specific titles of the foods being served.

You get my point?  All these things are little things but they can really add beauty, creativity and fun to the ordinary.  I would love to know what special little things you think make a big difference!

I was thinking about all of this as I was making Key Lime Pie this week.  As I made it, I was thinking about how much homemade graham cracker crust and whipped cream for really takes this pie up a notch. Such a small investment for a big difference!

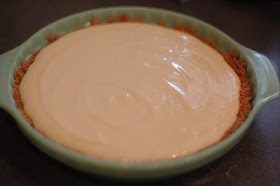
Key Lime Pie.
It is many people's favorite summertime dessert.
The filling is so creamy and tangy and the crust is sweet and buttery.  The whip is so light and fluffy.
I love it in the summer, or when we have Mexican food, or fish or really anytime of day, with any menu.
It is such a simple, timeless recipe.

I don't know if you have made many Key Lime Pies, or have eaten many.  But making a graham cracker crust takes about 5 minutes and the result is a crumbly, buttery, golden crust that you want to just eat by itself!  Buying a Keebler crust is more expensive and just can't compare to the crunchy buttery goodness of a homemade one.  And whipping cream is super simple and it typically costs no more to buy whipping cream than to buy Cool Whip.  And it is so much better (and not filled with a long list of chemical ingredients).

Key Lime Pie
1 1/2 cups Graham Cracker crumbs
1/4 cup sugar
1/2 stick (4 Tbsp. melted butter)

For a normal or deep dish pie pan:
2 cans Sweetened Condensed Milk
1 cup Key Lime Juice
6 egg yolks

{OR for a smaller aluminum pie pan}:
1 can Sweetened Condensed Milk
1/2 cup Key Lime Juice
3 egg yolks

Make Graham Cracker Crust – I put graham crackers in a ziplock bag and crush them with my fist, or with a mallet.  (You can make them as fine or coarse as you like). Stir together ingredients for the crust.  Combine until well incorporated.  Press into a lightly greased pie pan – reserving one spoonful for tasting (okay, you don't have to, but I can't ever resist!) Place crust into oven and bake for 10 minutes at 350 degrees.


In a separate bowl, combine all of the ingredients for the filling. Stir until consistent and smooth. (Hang on to the egg whites, as you can use them in another recipe or have them on hand for breakfast egg whites). Pour filling into crust.  Return to oven for 10 minutes (just to "kill" the raw egg).  Let sit on counter for 10 minutes to cool a bit.  Place in refrigerator for 4 hours or more – until set and cold.


whipped cream
Make whipped cream: 
Pour 1 pint of whipping cream into mixing bowl and let it go full speed for a few minutes until thickened and peaks remain when you pull out the beater. (Watch it or you will have butter in your bowl!) Add a hefty spoonful or two of sugar and voila! 

There you have it!
It doesn't get any better than this simple pleasure – it's the little things!

Wednesday, June 8, 2016

So-Good Brownies- A Recipe to Pass Along


This is a brownie recipe recently added to my collection and I am smitten. My mom made these brownies for my birthday this year.  She said she wanted to bake for my birthday but that she knows Dave enjoys the tradition of making me a birthday cake.  (I enjoy this tradition too!)  I suggested she make brownies or cookies since I love those too, and why not have brownies and cake!  

She ended up making cookies for dessert on the night we ate together for my birthday a few days before my actual day.  They were chocolate chip with pecans- one of my favorites.  They were beautiful and delicious! Then on my actual birthday, my dad came to a meeting on campus and surprised me with a plate of brownies (cut heart-shaped) and topped with chopped pecans.  They were amazing! There were too many for me to take home (since I knew cake was going to be at home), and not enough to take to class to share with my students.  So I shared them with my colleagues.  They were glad I did.

Tanya, the custodian who cleans our area, happened to be in the office at the time and I offered her one.  She gladly accepted.   A few days later I saw her in the hall and she said it was the best brownie she had ever had, and that she had saved part of it to share with her twin sister, Tonya.  (Yes, they are twins named Tonya and Tanya. She told me that it was the labor and delivery nurse’s idea to name them one vowel different when her mom had twins that she wasn’t anticipating!) According to Tanya, Tonya LOVES  brownies.  She said Tonya didn’t believe that the brownie was not from a bakery. She asked if she could buy some from my mom! I said, “You can’t buy them, but I will make them for you and give you the recipe.” 

I called my mom and told her how much we enjoyed them and asked for the recipe.  I went ahead and made a few copies of it when she passed it along.

A week or so later I made a batch and brought a box of them to work for her.  I couldn’t find her in the halls so I left it on my desk with the recipe and a note, as I knew she would come early in the morning to collect trash from my office. I ran into her several weeks later and she told me that they have been making this recipe a lot since I passed it along. So fun.  


This recipe is from The Southern Living SEC Tailgating Cookbook.  and has a side bar that says, “Go ahead and copy the recipe to give to friends at your tailgate.  They’ll be asking for it.” I think they are right.  They are chewy, thick, rich and lovely.  What sets them apart from other brownie recipes I make are brown sugar, unsweetened baking squares, and lots and lots of butter (not that this part is unique to this brownie recipe). 


Makes 16  2 inch square brownies

4 (1 oz.) unsweetened chocolate baking squares
¾ cup butter 
1 ½ cups sugar
½ cup firmly packed brown sugar
3 large eggs 
1 cup all-purpose flour
1 tsp vanilla
1/8 tsp salt

Preheat oven to 350˚. Line bottom and sides of an 8 inch square pan with aluminum foil, allowing 2 to 3 inches to extend over side; lightly grease foil.

Microwave chocolate squares and butter in a large microwave-safe bowl at HIGH 1 ½ to 2 minutes or until melted and smooth, stirring at 30 second intervals. Whisk in granulated and brown sugars.  Add eggs, 1 at a time, whisking just until blended after each addition.  Whisk in flour, vanilla, and salt. 

Pour mixture into prepared pan.


Bake at 350˚ for 40 to 44 minutes or until a wooden pick inserted comes out with a few moist crumbs.  Let cool completely on a wire rack. Lift brownies from pan, using foil sides as handles.  Gently remove foil, and cut brownies into 16 squares.  

(Note: this makes a 8 inch square pan, which I thought seemed small, but found that they are rich and thick! I have, however, doubled the recipe a few times when feeding a larger crowd.  This really spotlights the amount of butter, sugar and chocolate are in these lovely brownies!)


I am thankful when sharing a baked good and recipe can connect people to each other. You might want to make a batch and take them to work, or pass them to your neighbors (or tailgate- if you are are tailgater), and show some love via butter, chocolate and lots of sugar! And be ready with the recipe to pass it along. 
  
SaveSave