Tuesday, August 16, 2011

The End of the Pits

I have a thing for kitchen tools.  I really like them.  Garlic presses, zesters, kitchen scissors, measuring cups... In fact, for my birthday and Christmas, I usually get some kind of kitchen tool as a gift from my family.

Some gadgets you have in a drawer and never use.  They are not worth the space they are taking up in your drawer, and hardly worth having to wash when you've used them.  Others you use everyday.  Then there are those that you don't use often, but when you do it's so helpful that nothing else could do what it does.

the amazing pitter


My cherry pitter falls into the 3rd category!
Do you have one?
Have you ever used one?

It's genius! When I pull it out to use it –people are wowed!  It's simple, inexpensive, it takes very little drawer space and with the squeeze of your hand you can have a pitted fresh cherry.  And as special as cherries are,  cherries with pits are a challenge to reckon with – unless you enjoy the eating and spitting activity. (Which I do, given the right time and setting).

When you have cherries with the pits removed you can put them in a fruit salad, or make a pie, or chop them up for a topping on a meat dish.  You can find one at a kitchen store for about $10. (Ours is the oxo brand that my mom got at Bed, Bath and Beyond a few years ago).  You ought to consider buying one, if you love fresh cherries.


Lucy is really into cherries and is actually a very skilled pitter with this handy dandy gadget, especially considering that she is 3 years old.

My friend Melissa (the florist) was coming over for our women's prayer group the other night and was in charge of bringing a goody.  A few minutes before group she texted to tell me that she was on her way and asked if she could use my pitter for cherries for her dessert.  "Of course" was my reply and in a few minutes she arrived with a delightful Almond Shortcake, freshly whipped cream and fresh cherries.  We oohed and ahhed. She said our friend, Beth, who gave her the recipe serves it with blackberries.  Both sound amazing to me.

The Almond Shortcake is like a huge, puffy, almond sugar cookie with toasted almonds on top with a crunchy edge.  There is something so simple, yet elegant about this shortbread and it is de-li-cious! It seemed like the Shortcake and the cherries complemented each other so well.  Don't you think almonds and cherries often do that?


1 cup sugar
1/4 cup (4 Tbsp) unsalted butter
2 eggs
2 tsp almond extract
1 tsp vanilla extract
1 cup all-purpose flour

For topping:
1 Tbsp sugar
1 Tbsp sliced almonds

Preheat oven to 350º
Cream the sugar and butter
Mix in almond and vanilla extracts
Mix in eggs, one at a time
Mix in flour until combined
Pour into a greased 9" pie pan
Top with sugar and sliced almonds
Bake for 20-25 minutes until lightly browned on edges and a toothpick comes out clean.

Top with whipped cream and fresh fruit: berries or cherries or peaches. 

Cherries have been on sale the past few weeks here – so it has been time for cherries at our house.  And the pitter has hardly made it to the drawer, as it has been in constant use.  So, go get yourself a pitter or add it to your wish list!


Tuesday, August 9, 2011

Rosemary Cheddar Biscuits

Do you ever eat at a restaurant and wonder…"What is this seasoning?" or "How did they make this amazing dish?" or "I wonder what ingredients they used?"  Well, I do.

Sometimes I brainstorm what all could be in something.  Sometimes I have to close my eyes to discern it.  One night I tasted this squash soup and I couldn’t pin-point the flavor that was added to the squash in the puree.  Then I closed my eyes and the taste was obvious to me – it tasted like chicken noodle soup!  So I knew that it must have been chicken broth!

Sometimes I take a photo on my phone to remember the presentation, or the moment, or to jog my memory later, or just to savor it a little while longer, even if just through a photo!

the inspirational breakfast biscuit

Well, during our kids’ spring break in March, I snuck away with my friend Melissa (the florist Melissa) sans kids to have some uninterrupted quality time together (we each have 3 kids, so our time together is typically pretty rowdy).  We met for breakfast at one of our favorite local coffee shops, the Frothy Monkey.  Melissa got the special that was mentioned on the chalkboard:  a Rosemary Cheddar Biscuit with Swiss, Prosciutto, and spinach leaves. She let me have a bite and it was lovely!  I took this photo and decided that cheddar biscuits, plain or with anything on them, were something I needed to make.


I added it to my “to do” list and early this summer I dug around for a good cheddar biscuit recipe. I found this one from Southern Living a few years back.  It is simple to throw together, and the biscuits are flaky and delicious! I have made them twice now.  The first time, I made both with Rosemary and without.  My kids didn’t appreciate the strong herby taste, but I thought it was a nice addition.  We ate them straight off the plate.  I made them another time and sliced them open, then filled them with scrambled eggs and tomato.  You could put anything you want on them – breakfast meats, eggs, cheese, veggies, or butter and jam!

I love that a moment of breakfast yumminess in March at a cafe inspired batches of biscuits this summer.
Be inspired– replicate a tasty dish from a restaurant at home!  The crazy thing I want to replicate these days is the amazing Chick-fil-A Sauce (smokey honey mustard). I really want to figure out how to make it at home. Any ideas?


simple ingredients
1 ½ cups all-purpose flour
1 Tbsp. baking powder
½ tsp. salt
1 Tbsp. sugar
1 cup shredded sharp Cheddar Cheese
1/3 cup Crisco shortening
½ cup milk
20 rosemary leaves, chopped (optional)

Pulse first 4 ingredients in a food processor several times until thoroughly combined. 
Add shredded cheese and Crisco, and pulse 4 or 5 times or until mixture is crumbly.  With processor running, gradually add milk and mix until dough forms a ball and leaves the sides of the bowl.  If you are including the rosemary, add it now, and thoroughly blend.


Turn the dough onto a lightly floured surface; shape into a ball.

Pat or roll dough to ½ inch thickness, cut with a 2 inch round cutter and place on baking sheets. Then sprinkle a few shreds of additional cheese on top of each biscuit.

Bake at 425 degrees for 10 minutes or until golden.

crumbly dough mixture

ready for baking
with or without rosemary!


Monday, August 1, 2011

Cup-A Cup-A Cobbler

This time last year, I could never have guessed what a gift this blog would be in my life.  Started on a whim, as a way to find some creative outlet in my busy, duty-filled life, with very limited knowledge of blogging and sparse skills in the realm of technology.  Last August,  I was facing the beginning of another school year, and the end to another summer where I didn’t get to paint, or learn how to sew, or quilt, or print-make.   After reading The Homemade Life I was inspired.  I thought it would be a fun creative outlet to merge my love of sharing yummy recipes,  telling stories and connecting with people.  I took a risk, asked Dave if he would partner with me to help with the technology of it, and see if we could give it a try.  He said, "Yes!" and before you know it we were securing a blogspot and trying to come up with a name for this unknown adventure.
The name, Cup-a Cup-a, came to me as I was pondering my intention of swapping ideas, recipes and finds with friends. I was inspired by the recipe sharing that was done in the film Steel Magnolias of the cake recipe. Clairee, my favorite, asks Truvy for the recipe for her Cup-a Cup-a Cup-a. She told her she didn’t need a recipe it was just “a cup of flour, a cup of sugar and a cup of fruit cocktail with the syrup, stir and bake in a hot oven ‘til golden brown and bubbly. I serve it with ice cream to cut the sweetness.” And though I’m not a big fan of canned fruit cocktail,  I am a fan of southern women and sharing what you know.  Thus this blog began.
A few months ago someone asked me for the recipe for the cup-a cup-a cobbler that I like to make and I realized that I have never posted about it. Kind of ridiculous!  So I decided to post it today in celebration of the 1 year anniversary of this blog.  And the Peach version was in order since they are at the peak of the season and my blog began with peaches this time last year.
Cup-A Cup-A Cobbler (Dump Cobbler)
This is the easiest cobbler. It is magical because the crust rises to the top while baking.  It is the very simplest cobbler and it is so very yummy. You pour in the batter, top with the fruit and during the cooking time, the batter seeps through to the top and forms a buttery, lovely crust with the cooked fruit below.  And as my friend Amy, reports that what makes it so yummy, as the batter leaves some of its gooey breadiness in the filling so that it thickens it.
It is embarrassingly simple, from-scratch, and a crowd pleaser. And, you really must serve it with a scoop of vanilla ice cream (or "banilla", as my 3 year old, Lucy, calls it).

1 1/4 cup sugar, divided
1 cup self-rising flour
1 cup milk
1/2 stick butter, melted
2 cups fruit; Berries, Peaches, a combo (frozen fruit is great... unthawed)

(The sequence of the addition of each ingredient is important.)
Whisk 1 cup sugar with flour.
Add milk just until blended.  
Add melted butter.  
Place in greased pie plate or small pyrex dish.


Sprinkle fruit with remaining ¼ cup sugar in a bowl.  
Dump on top of batter.  Bake at 350 degrees for 40 minutes to 1 hour (until golden and bubbly and no liquid remains in the center). 

I doubled the recipe to make a larger batch.  Just make sure you put it in a big enough dish.
I make it year round with frozen fruit and it works great.

a single batch version with berries


So, thank you for reading,  trying the recipes, giving your ideas, and cheering me on.  It has been such a fun, therapeutic outlet for me and I am so honored and amazed that you continue to stop by!

My peachy keen niece!


I'm getting excited about all the recipes and ideas I want to share with you this year and look forward to the inspiring seasonal foods that are around the corner!  Here's to another year of cup-a cup-a fun! 

Tuesday, July 26, 2011

The Winning Waffles

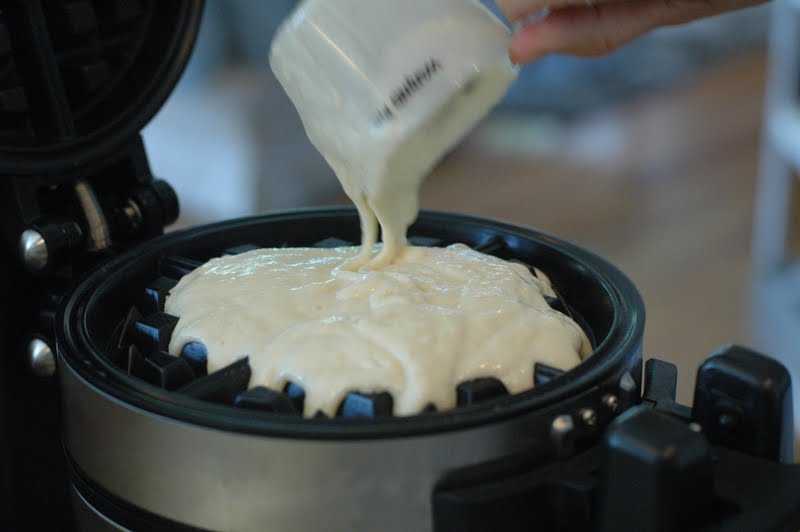
Recently my mom fulfilled a dream of hers and bought a heavy-duty, double-sided, flipping Belgian waffle maker.  You know the kind they have at hotels? She had always thought they were not only so cool and fun, but really useful in allowing you to make waffles in double-time! And she was right.  It is really useful and fun! In order to inaugurate this new waffle maker she decided to dig back into her Better Homes and Gardens classic cookbook, the one with the red-checked cover (which she bought in the early '60's),  to find a waffle recipe.  She found "Oh Boy!" Waffles and Oh Boy is right! They were the best waffles I have ever had.  Now, truth be told, if it’s buttery, crispy, syrupy and warm, I’ll probably love it, but THESE were like none I had ever had! So crispy on the outside and fluffy on the inside (almost like a popover).
side view of this amazing waffle


I started thinking about THE BEST RECIPE cookbook, which I mentioned last week with the Kabob marinade.  Their French toast is the very best French toast I have ever made in my kitchen. It’s the closest to Pancake Pantry (which to me is the standard of great French toast).  So, I decided, in the spirit of Bobby Flay from Food Network, that a Waffle Throw-Down was in order.  (If you are not familiar with the throw-down – in this TV show, Mr. Flay, an excellent chef, challenges a different chef each time to compete for the best meal.  Typically he challenges himself to create a meal that is superior to that of the opposing chef.  He usually chooses the signature dish of the chef.  Gutsy, I know!  And then they have tasters who vote to determine who “won the throw-down”.


So, as I thought of BEST RECIPE and their claim that, through extensive recipe trials, they had landed on the perfect recipe, and yet I had tasted the Oh Boy! Waffle, which I would award with the title of the perfect waffle, I felt a throw-down was in order. So, mom brought over the waffle iron and we had ourselves a throw-down:  BEST RECIPE vs. Oh Boy!  And by all accounts Oh Boy! won.  Our judges managed to scarf both down, but the flavor and texture of the Oh Boy! made it the winner.

beating the egg whites for the BEST RECIPE waffles


Here’s the feedback from the judges. (By the way, the judges were a diverse group ranging from age 3 to 69, both male and female, and with varying standards).  They determined that the BEST RECIPE is a good, really good, classic waffle, with good flavor and a nice texture, though pretty dense.  The Oh Boy! has this amazing crunchy exterior – that you want when you are about to pour syrup all over it, yet the inside is mysteriously silky.  How the exterior is so firm and the inside so fluffy, I don’t understand.
Another deciding factor was the preparation.  The BEST RECIPE requires stifly-beaten egg whites to be folded into the batter.  This was tricky, time- consuming and added to our pile of dirty dishes.  It also calls for buttermilk and the Oh Boy! calls for milk (which is typically more on-hand in most kitchens).  The Oh Boy! recipe is simply a "stir the dry; "stir the wet; and gently combine" recipe.

You’ve got to try them. 
thin, lumpy and perfect

Oh Boy!


2 1/4 c. sifted all-purpose flour
4 tsp. baking powder
1 1/2 tbsp. sugar
3/4 tsp. salt

2 beaten eggs
2 1/4 c. milk
3/4 c. salad oil (canola, vegetable oil)


Preheat waffle iron.  Stir together dry ingredients. Combine remaining ingredients and add just before baking, stirring only until moistened and fully incorporated.  Batter will be thin. (Lumps are okay).  Spray waffle iron with cooking spray.  Bake in preheated waffle iron.
Makes 8 to10 waffles.

A couple of tips:
+While you are making your waffles, have your oven preheated to 250 degrees with a cookie sheet on the rack.  As you remove the waffles from the waffle iron, transfer them to the cookie sheet to stay warm.  (It really does a good job of keeping them warm until your whole batch is ready to serve).

+It makes about 8 waffles.  When we made them for my family of 5, we had a couple leftover.  We froze them flat in ziplock bags to pull out like Eggo Waffles another day.  They were great warmed in the toaster oven.
our favorite syrup!


Tuesday, July 19, 2011

Kabobs


Summertime means Grilling.  One of our favorite meals on the grill is Kabobs (or Kebabs – the spellings are interchangeable, seemingly a difference in origin – Arabic, Persian, etc.). They are a party waiting to happen!  Dinner on a skewer!

8 Reasons Why I Love Kabobs
1. It’s a grill-focused meal, which means the heat is out of the kitchen and outside where it belongs!

2. It’s a fun meal to share with guests because people can hang out around the grill tending it while others are in the kitchen getting the rest of the meal ready.

3. There’s something for everyone with Kabobs!  Whether you are a meat-lover or vegetable-lover, it’s a meal for you. 

4. It’s really versatile – you can use any meat (steak, chicken, shrimp, pork) or vegetable (peppers, mushrooms, squash, tomatoes) or fruit that you want to or that you have on hand.

5. It’s healthy and tasty! (Always a winning combination).

6. It’s an easy meal that doesn’t require lots of recipes, just a lot of prepping.

7. Speaking of prepping, it can be done ahead of time (which is always helpful).

8. Different sauces (homemade or purchased) can add a fun zing and variety to the meal – I’ve done Tzatziki Sauce, Satay Sauce, Chipotle Sauce.


from my 1969 set of skewers that I inherited
I have tried different things throughout the years and there are many approaches and options when preparing kabobs.  Metal skewers vs. wooden skewers; make your own personal kabob vs. community kabobs; all meat on some skewers/all veggies on the others vs. mixed skewers; to name a few. 

Here are some things we have learned along the way:
If you use wooden skewers (which are good if you don’t have enough metal ones or you don’t own any metal ones) it is imperative that you follow the instructions on the package about soaking the skewers before using them on the grill.  Trust us, we learned the hard way.

The time we tried the “make your own kabob approach" it became a messy, raw-meat, confusing-to-label-situation that we forfeited and made community Kabobs.

As far as a varied skewer vs. a segregated skewer- the rule of thumb is to put things on the same skewer that will require a similar amount of cooking time.  I like to include onion on meaty skewers just to add flavor to the meat, however, many veggies cook at a different rate than meat so we more often segregate the veggies and the meats.

Prepare and marinade the meat:
According to THE BEST RECIPE: Grilling and Barbecue* cookbook – by the editors of Cooks Illustrated culinary magazine, after laborious research on kabob marinade research, came to the conclusion that an acidic marinade  (one with lemon juice or vinegar) was less effective in keeping in the flavor and creating a good texture to the meat than an oil-based marinade. And in order to have the nice flavor of the lemon or lime, the most effective technique is to squeeze it on top of the meat when taking it off of the grill after cooking.

*(Side note:  if you have never read this book or magazine, and you like an analytical, research approach to cooking, you must check it out.  I find it to be fascinating and sometimes comical!  They take their cooking research very seriously!)

So, we followed their recipe and it was very tasty!

Marinade:
1/4 cup extra-virgin olive oil
3 garlic cloves, minced
3/4 tsp. kosher salt
1/2 tsp fresh ground pepper
(for chicken, additional herbs--basil, oregano, etc. are welcomed)

2 pounds beef tips &/or chicken breast cut into 1 1/2 inch cubes

Lime or lemon for squeezing at the end

Stir together ingredients for marinade.
Place meat in marinade.
Toss to coat evenly.
Cover and refrigerate until well seasoned (1 hour or up to 24 hours).

Prepare the Vegetables (and fruit)
Clean and cut into large chunks:
Bell Peppers
Mushrooms
Zucchini
Onion
Pineapple

Place in a bowl and toss in a drizzle of olive oil until coated.  Season with Kosher Salt and Fresh Ground Pepper.

Skewer the Veggies and Meat onto Skewers.

Grill until meat is well-browned, grill-marked, and cooked at least 8 minutes.  Grill veggies until tender.

 
I like to serve with a rice dish.  Our favorite fast and easy and tasty is the Saffron Yellow Rice.

I also like to serve a green salad with this meal.  Last week we made a Greek salad and I loved scooping up the rice, salad and kabob with the Greek dressing and the Tzatziki sauce.
For my Greek Salad, I included Romaine Lettuce, Shredded Purple Cabbage (from my mom's neighbor's garden), grape tomatoes, diced red onion and Feta (of course).
I would have included cucumbers, olives and banana peppers if I had had them that day.
The dressing is super simple and tasty!


                                                         Greek Dressing:
1/3 cup red wine vinegar
1/3 cup cup lemon juice
1 tsp. oregano
1 tsp. parsley
2 cloves fresh garlic, minced
1/4 tsp. kosher salt
1/2 cup olive oil

Stir together all ingredients except oil.  While whisking vigorously, slowing pour in oil until well incorporated and thick.

                                                                                    
(Last year when we were having a Kabob gathering I asked my friend, Stephanie, to find some fun sauces and she found these recipes from here and there.  Yum! They were all good and something for everyone.)

Tzatziki Sauce- Greek yogurt sauce
2 (8 ounce) containers plain yogurt
2 cucumbers - peeled, seeded and diced
2 tablespoons olive oil
1/2 lemon, juiced
salt and pepper to taste
1 tablespoon chopped fresh dill
3 cloves garlic, peeled

Blend or process, refrigerate, and serve cold. Refreshing and delicious!

(We have omitted the cucumbers before and it makes a tasty sauce that my family loves!)

Satay Sauce- Thai peanut sauce
1 (10 ounce) can coconut milk
1/2 cup crunchy peanut butter
1/2 small onion, grated
1 tablespoon dark soy sauce
2 teaspoons brown sugar
1/2 teaspoon red pepper flakes
Directions
In a saucepan over medium heat, combine coconut milk, peanut butter, onion, soy sauce, brown sugar, and pepper flakes. Bring to a boil, stirring frequently. Remove from heat, and keep warm.

Chipotle Sauce- Spicy cream sauce
1/2 cup plain yogurt
1/2 cup mayonnaise
2 teaspoons pureed chipotle peppers in adobo sauce

In a small bowl, mix together the yogurt, mayonnaise, and chipotle peppers until smooth. Chill until serving.


Ready, Set, GRILL!!!


Sunday, July 10, 2011

Little Things Make A Big Difference


I believe that little things can make a big difference.  It might only take a few more minutes, or a couple more dollars (or not any more $$ at all) – just a little time, creativity and intentionality, and you can greatly enhance the beauty and enjoyment of things.
For example:
>Use a pretty tablecloth or cloth napkin whenever you can (some of my favorites I got at thrift stores and antique stores).  It can add such a nice touch.

>Instead of pens rolling around in your junk drawer, why not put them in a fun jar on the table?

>On a nice evening when a friend comes by, why not light some candles outside and sit for your visit?  (It can feel magical!)

>Or keep a dish of yummy seasonal candy on your office desk to share with those who pass by.

>When you have a meeting to attend, make some cookies or muffins to take with you.

>Place a pretty napkin in a basket when serving muffins.

>Write a handwritten note of love, thanks, or well wishes to someone.

>Have a small vase of fresh flowers in the room for your spend-the-night guest.

>Sprinkle coarse sugar on top of your muffins.

>Use fresh garlic &/or herbs in place of dried when cooking.

>When hosting a gathering, make little tents out of card stock with labels of "de-caf" or "regular" on your coffee or specific titles of the foods being served.

You get my point?  All these things are little things but they can really add beauty, creativity and fun to the ordinary.  I would love to know what special little things you think make a big difference!

I was thinking about all of this as I was making Key Lime Pie this week.  As I made it, I was thinking about how much homemade graham cracker crust and whipped cream for really takes this pie up a notch. Such a small investment for a big difference!

Key Lime Pie.
It is many people's favorite summertime dessert.
The filling is so creamy and tangy and the crust is sweet and buttery.  The whip is so light and fluffy.
I love it in the summer, or when we have Mexican food, or fish or really anytime of day, with any menu.
It is such a simple, timeless recipe.

I don't know if you have made many Key Lime Pies, or have eaten many.  But making a graham cracker crust takes about 5 minutes and the result is a crumbly, buttery, golden crust that you want to just eat by itself!  Buying a Keebler crust is more expensive and just can't compare to the crunchy buttery goodness of a homemade one.  And whipping cream is super simple and it typically costs no more to buy whipping cream than to buy Cool Whip.  And it is so much better (and not filled with a long list of chemical ingredients).

Key Lime Pie
1 1/2 cups Graham Cracker crumbs
1/4 cup sugar
1/2 stick (4 Tbsp. melted butter)

For a deep dish pie pan:
2 cans Sweetened Condensed Milk
1 cup Key Lime Juice
6 egg yolks

{OR for a smaller aluminum pie pan}:
1 can Sweetened Condensed Milk
1/2 cup Key Lime Juice
3 egg yolks
Make Graham Cracker Crust – I put graham crackers in a ziplock bag and crush them with my fist, or with a mallet.  (You can make them as fine or coarse as you like). Stir together ingredients for the crust.  Combine until well incorporated.  Press into a lightly greased pie pan – reserving one spoonful for tasting (okay, you don't have to, but I can't ever resist!) Place crust into oven and bake for 10 minutes at 350 degrees.


In a separate bowl, combine all of the ingredients for the filling. Stir until consistent and smooth. (Hang on to the egg whites, as you can use them in another recipe or have them on hand for breakfast egg whites). Pour filling into crust.  Return to oven for 10 minutes (just to "kill" the raw egg).  Let sit on counter for 10 minutes to cool a bit.  Place in refrigerator for 4 hours or more – until set and cold.


whipped cream
Make whipped cream: 
Pour 1 pint of whipping cream into mixing bowl and let it go full speed for a few minutes until thickened and peaks remain when you pull out the beater. (Watch it or you will have butter in your bowl!) Add a hefty spoonful or two of sugar and voila! 

There you have it!
It doesn't get any better than this simple pleasure – it's the little things!


Monday, July 4, 2011

Savory Summer Pie

I have been waiting for the tomatoes to be red and juicy, and the basil to be strong and hearty in the garden to post about one of my favorite dishes.  It's the first week of July, I think the time has come! Savory Summer Pie. It's like quiche-meets-tomato pie.  It starts with sauteeing onions, garlic and red bell peppers, adding eggs, cream, Monterey Jack and Parmesan cheese, fresh basil and seasonings, pouring it into a pie crust, topping it with sliced tomatoes and then baking it.  A Savory Summertime Pie.

I found this recipe in a Southern Living Magazine over a decade ago.  I clipped the recipe, because it looked so yummy and had ingredients that I love! And I have been making it every summer since...and hardly altering it because it is so delicious as is.

It's a great dish that becomes a complete meal when you serve it with a green salad or some fresh fruit.

I like to take it as a main dish for a meal to friends who have new babies or are in need of a meal.    My friends, Angela and Ray, had their first child 12 years ago and I brought this to them.  Ray joked that it was worth having the baby to get this Savory Pie.  A couple of years later, when they had their second son, they requested a repeat of this meal.  I was shocked that they remembered what I had brought 2 years before, and was, of course, honored to bring them a repeat meal for baby #2.

Fast forward a decade.  This spring, my friend, Alyson, had a baby and when I asked her what meal she wanted me to bring to her family, she said she just wanted a batch of homemade granola.  I've never had that requested as a meal! While I agree that Granola is one of my favorite foods to come out of my oven, it really isn't dinner!  Then after thinking about it, I decided that I would indeed make her a batch of granola, and take a quart of vanilla yogurt and some fruit for parfaits along with it.  But I would also make this summer pie for a main dish and serve breakfast for dinner.  (I love breakfast for dinner, as breakfast foods are my favorite.  However, in my home, the only way I can woo my family to want breakfast for dinner is to include breakfast meat, especially bacon, on the menu.)  Alyson is not a fan of meat, but her husband is, so I took him a pound of bacon to satisfy his manly-meat desire.

This Savory Pie is a simple recipe, the only catch is the timing of the baking.  I have so thoughtfully created a demonstration of what NOT to do regarding this.  (See exhibit A below)
exhibit A
There is the ever-present challenge with pies:  getting the filling fully baked without burning the crust! So, here's the story.  I made this recipe a couple of months ago and took photos along the way so that when the tomatoes were right, I would have the photos ready for this post.  Then this past week, as I started writing the post, I began craving the Savory Pie and had to make it again!

So on Thursday night, I was making the pie and was concerned that the crust was getting too done and the filling seemed to be almost done!  We were in a rush to get to a meeting and had to hurry.  So, I took it out a few minutes early hoping that during the 5 minutes of "resting time", it would jell and be fine.  When I began to slice the pie, it was obvious that the filling was not done. So we proceeded to eat the done parts and save the rest for when we could re-heat it.

Moral of the story- cook until the filling doesn't giggle when gently shaken, even if the crust is looking overdone.  I tried to "foil tent" 1/2 way through the baking.  I have tried this many times and I have never had good luck with it.  It either falls off as I am attempting to get it covered, or I burn my hands or it falls off as I slide the rack back into the oven and it burns anyway!  I am thinking it might work better if I cover the crust with foil before baking and then remove at the end to brown.  (Easier to remove the foil than add the foil in a hot oven, I'm guessing.)

Do any of you have a good remedy for keeping the pie crust from over-baking?  Any tricks to share with us? Please let us know!
par-baked crust

Savory Summer Pie

1 pie crust- refrigerated bought or homemade
1 red bell pepper, chopped
½ purple onion, chopped
2 cloves garlic, minced
2 Tbsp olive oil
2 Tbsp chopped fresh basil
4 large eggs
1 cup half & half
1 tsp salt
½ tsp pepper
2 cups (8 oz) shredded Monterey Jack cheese
1/3 cup shredded Parmesan cheese
3 plum tomatoes, cut into ¼ inch-thick slices

chopped vegetables


Fit piecrust into a deep-dish tart pan; prick bottom and sides of piecrust with a fork.  Bake at 400 degrees for 10 minutes.  Remove from oven; set aside.


Meanwhile, sauté bell pepper, onion, and garlic in hot oil in a large skillet 5 minutes or until tender; then stir in basil.  

Whisk together eggs and next 3 ingredients in a large bowl; stir in sautéed vegetables and cheeses.  Pour into crust; top with sliced tomato. 

Bake at 375 degrees for 45 to 50 minutes or until set.

Let stand 5 minutes before serving. 

the filling

pre-baking 


Thoughts about the Pie Crust - you can make one from scratch for this, but I never do (especially with my aforementioned burning issues...it's not worth the risk).  If you have a Trader Joe's where you are, you need to try their frozen pie crusts. They are fabulous! My friend Amy told me about them recently.  Up until then,  I had used the Pillsbury (red skinny box) refrigerated pie crust which are also a great product.

[Speaking of Pies, the next post is my favorite pie- Key Lime Pie! ]