Showing posts with label appetizer. Show all posts

Wednesday, August 20, 2014

Hummus: Cracking the Code

                                                   
We play this game in my family, when we cook something that is pretty, or yummy, or special.  We say, "How much do you think this would cost at a restaurant?" And then we speculate about how much it might cost.  Sometimes we actually look up menus online to see what a similar meal out would cost. And then we discuss how much it probably cost to make it at home, which is usually a fraction of the price of buying it out.   

Or when we are at a restaurant eating something that we think we could make at home fairly easily, we then play the game in the opposite way. "I wonder how much it would cost to make this meal at home?", we might say.  And then we try to remember the details of the plate, meal, cookie, (fill in the blank)…so that we can go home and try to recreate it. 

I saw this sticker on a light post when I was in Washington D.C. last spring. 
It inspires me on those days that I don't want to cook.  
 Hummus is one of those things that I buy in a grocery, and buy in a restaurant and make at home. Though I have been making hummus for many years, I have never felt like my homemade hummus was equally as good as bought hummus- until this summer! I had hummus that a friend from church, Christi, made that was the great texture that store-bought has.  She gave me the recipe, which came from Cook's Illustrated  The Science of Good Cooking and gave her tips to me as well.  The trick to the texture is in dealing with the chick pea skin.  It is what can mess with the texture and make it chunky and/or mealy rather than smooth.  Baking soda is the remedy and I have explained in the recipe below how to deal with the skins when using canned beans as well as dried beans.

I have always had an internal conflict with the Tahini aspect of Hummus because it is the most expensive and only fatty part of the recipe.  I have made it without it at times.  However, I do think the Tahini is important- for texture and depth of flavor, but in my recipe I reduced the tahini drastically from the Cook's Illustrated proportions.

The garlic/lemon/spices/salt proportions are purely a matter of personal taste.  So, you will want to make it and then tweak it, taking notes as you do it, so that you find the right amounts for your liking.  (I wrote here about notating recipes.)


my motley taste testers
Another great thing about Hummus made at home is that you can tweak it to your liking.   Some like it zippier, with more lemon; or more garlicky; or herb-y.  We did a taste test at my house. And, as is typical in our home, there was diversity of opinions.  So we divided the hummus and seasoned a small batch of each.

the varieties they came up with :smoky paprika party; moving cumin;
and spicy red (with cayenne pepper)


Ultimate Hummus
adapted from The Science of Good Cooking
(Makes about 2 cups)

½ cup dried chick peas, picked over and rinsed
(¼ cup chick pea cooking water reserved from cooking them)
½ tsp. baking soda
4 Tbsp. lemon juice
2 Tbsp. tahini
2 Tbsp. olive oil
2 small garlic cloves, minced
½ tsp. salt
¼ tsp. ground cumin
pinch of cayenne pepper or smoked paprika (or more to your liking)
(optional- 1 Tbsp minced fresh cilantro, basil, parsley or roasted red pepper)

1. Place beans in a large bowl, cover with 1 quart water, and soak overnight.  Drain.  Bring 1 quart water, beans, and baking soda to a boil in large saucepan over high heat.  Reduce heat to low and simmer gently, stirring occasionally, until beans are tender, about 1 hour.  Drain, reserving ¼ cup bean cooking water, and cool.

2. Combine water & lemon juice in a small bowl or measuring cup.  Whisk together tahini &  2 Tbsp. oil in a second small bowl or measuring cup.

3. Process chickpeas, garlic, salt, cumin, and cayenne in food processor until almost fully ground, about 15 seconds.  Scrape down bowl with rubber spatula.  With processor running, add lemon juice mixture in a steady stream.  Scape down bowl and continue to process for 1 minute.  With processor running, add tahini mixture in steady stream; continue to process until hummus is smooth and creamy, about 15 seconds, scraping down bowl as needed. 
4.Taste and add more ingredients to your liking- lemon, garlic, tahini, salt, oil, or spices

5. Transfer hummus to serving bowl, top with a  sprinkle of paprika, cayenne, herbs and/or a drizzle of olive oil.  Serve. 

(Hummus can be refrigerated for up to a week.  When ready to serve, stir in 1 Tbsp. warm water if texture is too thick).


If you are making from canned chick peas:
Exchange:
1 can chick peas- drained and rinsed for the ½ cup of dried peas
¼ cup tap water to replace the “cooking water”
and 1 ½ tsp. baking soda for the ½ tsp.

And exchange step #1 with this step #1
1.     Drain can of beans.  Rinse and drain.  Place in a bowl.  Mix 1 ½ tsp. baking soda with beans and heat in microwave or in a pot on the stove until hot.  Pour into a bowl of water and rub chickpeas vigorously between your hands to get rid of most of the skins.  (They will easily come off and float to the top of the bowl of water – it’s pretty great. )
Change the water 3-4 times to remove all of the baking soda (or it will give a soapy taste).


This was the hummus dinner plate I made the other night.  A pile of greens, topped with sliced tomatoes, olives, feta, greek dressing and a portion of hummus - eaten with some crackers.  I think at Fido, a favorite eatery of ours, their Mediterranean salad, which is similar but with less veggies, is $6.99.   Which adds up when you add beverages and tip 
(and 5 people on the ticket).  Their veggies and hummus bowl is $5.99.  I estimate it costs about $2 to make a batch of hummus. 

P.S. A recent development: Asher, my "I hate beans" son, wrote on his student profile sheet for his new teacher- that his favorite snack was Hummus and Pita Chips.  I was astounded.  This is big y'all. 

Wednesday, February 26, 2014

Cilantro Sour Cream Dip and Tostadas

We have been having a lot of conversations lately in our house about whether foods are finger foods or fork foods.  My 12 year old is the chief offender of eating with his hands.  In his defense, he is a great eater and his messy eating struggles really have to do with the passion with which he eats his food! (He comes by this passion honestly.)  He wants to get more in a bite than the fork sometimes can capture.  We occasionally joke about sending our family to manners classes or Cotillion… but we are not really serious about this.   We just remind them, when necessary, that "this is a fork food", or "put your other hand in your lap while you are eating to keep it out of the food".  I tell my son that, perhaps he just lives in the wrong country. "In India they eat with their hands as a normal custom.  They scoop the food with Naan and use their hands as their main utensils.  It is culturally appropriate." He nods. "In India."

A favorite meal lately in our house has been Tostadas.  People define them differently, but basically- in our home - they are a flat, open faced taco pile.  I don't know if you make them, but I like that they are a change of pace from soft tacos and burritos and yet a lot easier to fill and eat than hard shell tacos. AND they can be eaten with your hands (forks are optional).

They are so delicious, quick and made-to-order!  We made them with leftover rotisserie chicken and refried beans last week.
We make them by putting the meat or beans on a flat taco shell and top with shredded cheese


and warm on a baking sheet in the oven for a few minutes until it's warm and the cheese is melted.  

Guacamole- [My favorite way to whip up some guac is: 2 ripe avocados, smashed; 2 cloves of minced garlic; the juice of one lime; a sprinkle of coarse salt; and a large spoonful of salsa (whatever is nearby). Stir and eat. YUMMY!]
 
Then we remove it from the oven, place on plates, and top with lettuce, tomato, sour cream and guacamole.  

We typically use tostada shells that you buy in a bag (or a box) at the grocery, though sometimes we bake tortillas for a few minutes to crisp them up and use them when we don't have hard shells.  I have never fried tortillas to make my own tostada shells (because a large motivation for me to make this meal is the EASE of it), but you could.
And to add some excitement to the meal you need to try this dip!

A few weeks ago, at the Social Work department Chili supper that I wrote about, my student Bryan brought this delicious dip to share! He had asked me at class earlier in the week if the students were to bring anything.  I told him that he was free to bring anything if he wanted to, but nothing was required, or expected.  He brought a bowl of this dip and we were glad he did!

It's tangy, creamy and so flavorful.  You can alter the amount of kick it has to your liking.


It's similar to Chuy's Creamy Jalapeño dip, if you have ever had it (just a little thicker).

Cilantro Sour Cream Dip

16 oz. sour cream
1 jalapeno
1 bunch of cilantro
1 clove garlic
1/2 package of dry Hidden Valley Ranch dressing mix
1/4 cup light mayonnaise
juice of 1 lime

Seed and chop the jalapeños (You can leave in just a bit of the seeds and membrane if you like the dip to be spicier.)
Wash and trim the cilantro of thick or long sections of stem.
Chop garlic cloves
Juice lime
In a food processor or blender, add all of the ingredients.  Pulse till it is a soft and creamy constancy.
Serve with chips, on tacos, as a mexican taco salad dressing.  


Enjoy!

P.S. I asked my son's permission to write about this "eating fork food with hands situation" on my blog. He said,  "well, it's true, so yes, you have my permission". 

Saturday, January 4, 2014

Some December Favorites


December was such a busy month with a very full load of grading and closing down the semester,  followed by a child-filled holiday season. Therefore,  blogging had to be put on the back-burner.

However, two things that I made this month, that I just have to share are Cranberry Sauce and Jalapeno Poppers.

Homemade Cranberry Sauce.
I have a great love for cranberries. I wrote about it HERE.  And this very time-limited cranberry season is about to end!  So, if you haven't already stocked your fridge/freezer with cranberries, get them quick.  My Kroger had them on clearance this week for 25 cents a bag!

Cranberry sauce is one of those recipes that people think is complicated or difficult but actually it is quick and very simple. I made a few batches of cranberry sauce this season. YUM! So easy and so delicious!
Just a few ingredients!
Place a bag of fresh cranberries in a large pot on the stove (pick out any rotten or shriveled berries from the pot). Add 1 cup of granulated sugar. Pour in 1 cup of water. If you want, you can add the zest of an orange. Stir ingredients together. Heat on medium high for 10 minutes, stirring often, until the berries pop. Take off of stove and let cool. Sauce will thicken as it cools. Store in a tight container in the refrigerator.


I love cranberry sauce on top of meat, on a turkey sandwich, as a side dish with a savory meal, or swirled into my plain greek yogurt for breakfast!
Having a jar of it in the refrigerator inspires all kinds of uses.


Secondly, these Bacon Wrapped Jalapeño Poppers were a favorite of our season.

Maybe because it's been the holiday season and it inspires party food.  Or maybe it's because cooking a whole meal lately has felt overwhelming.  But I've been wanting snack dinners lately.  We have had appetizers for dinner several times during the holidays.  Sometimes we have had crackers and cheese, sliced apples,  hummus and veggies, goat cheese with pesto and sun-dried tomatoes with crackers and pita chips, texas caviar and chips.  And if we're really going for it- these bacon wrapped pepper poppers have made it on the menu!
We made these a couple of summers ago for the first time when grilling with friends and we fell in love.
They are a little kicky but the spiciness really varies pepper to pepper.

They are simple and just have three ingredients: jalapeño peppers, cream cheese and bacon.

Slice jalapeños long-wise and carefully hull out the seeds and the white inside the pepper (the seeds are the hot part of the pepper, so be careful when handling them!).
Use a knife to smear softened cream cheese into each of the peppers.  Slice bacon in half and wrap a piece around each pepper, securing the two sides together on top.  Place them on a grill over medium heat.  If you have a higher rack, use it. Cook until bacon is fully cooked and crispy, and the jalapeños are softened. Serve immediately.

Or if you don't have easy access to a grill, you can place them on a baking sheet and bake them in a 375˚ oven for 25 minutes, or until bacon is crispy.    


I love December and the foods and festivities, however, I sure enjoy starting a new year, embracing a clean slate.  So, I've packed up the Christmas decorations, made some resolutions and am thankful it's January.

 I hope you are having a great start to a new year.


Tuesday, September 3, 2013

Mexican Layer Dip- A Party Food Where The Party Is Optional


Do you love Mexican Layer Dip as much as I do?  Tell me you've had it.  It's one of my favorite party foods to make (and eat). It is always a crowd-pleaser.  You can add or delete anything you like.  I put cilantro, mostly because it's so fresh and pretty, but you can omit it.  I didn't put olives, though some people include them.  I was afraid the non-olive people would be turned off.

 In deciding what to blog about this week,  I was looking through photos of food I have made and kept coming back to the photos of the Mexican Layer Dip.  It's so yummy! It's a shame that it is a party food, since I don't have any parties to cook for this week and instead I have family dinners I need to be cooking every night!    

The more I think about it and the longer I look at these photos, the more I'm tempted to make this for dinner this week – served with chips and warm tortillas. And we can scoop up the dip and make a meal out of it.  

Who says Thursday night family dinner can't be a party, right?   


2 cans refried beans

cumin, garlic powder & hot sauce

16 oz. container of sour cream

guacamole (bought or homemade)

1 cup grated cheese (cheddar, pepper jack, colby-jack)

lettuce- shredded

diced tomatoes

cilantro leaves


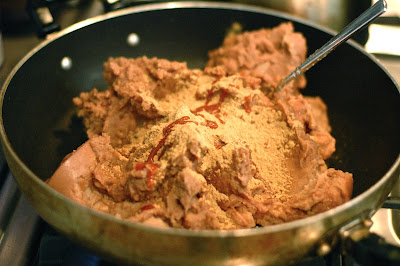
Warm beans in a skillet on the stove top.  Add 2 tsp. ground cumin, ½ tsp. garlic powder and a couple of dashes of hot sauce.

 Stir together and warm until thoroughly heated. Spread on platter. Smooth until even. 


Spread sour cream on top, leaving an edge to reveal the beans underneath, and then guacamole


Continue to layer with cheese, lettuce, tomatoes and cilantro.

Serve immediately (or keep covered in refrigerator until time to serve).  Serve
the day you make it. 


Sunday, October 14, 2012

Chimichurri – I Could Almost Drink It!


Have you experienced Chimichurri? It's an Argentinian Sauce, similar to Pesto, but made with a Parsley base.  If you haven't, you must! It was love at first taste for me.  A couple of years ago we went to Eastland Cafe for dinner with friends. In our life, this is considered special-occasion, high-style dining – since eating out in our world usually does not include table cloths, servers, and low lighting.


(I wrote here about the dilemma I face when upscale dining, regarding the salad and main dish courses.)

I struggle with the fact that meat is typically not my favorite part of the meal, and yet it is seen as the main attraction on most menus.  Everything else is simply building up to this apex.  I had difficulty ordering at Eastland Cafe because of this very dilemma.  So, I opted instead to order a salad and some sides.  I felt good about the decision.  I had fried green tomatoes, a beet-topped green salad, a sweet potato dish and something else that escapes me now.  It was all very tasty.  However, I have to report that the highlight of the meal, for me, was the fresh, warm bread and bowl of chimichurri for dipping that was brought at the beginning of our meal.  Oh my....a party for the taste buds! It was so good, I almost drank it.  This began my love (and pursuit) of chimichurri.

I talked to my creative, culinarily friend Rich about it (who happens to be an amazingly creative photographer as well), because I figured he might have a recipe for it.  This summer, he made it happen.  And it was everything I dreamed it to be! He served it poured over grilled flank steak and it was a hit. We all, including the kids, went crazy (Asher went a little crazier than the other kids, but they all loved it). We served it with roasted vegetables, braised purple cabbage and crusty bread.  During the meal we felt compelled to pour the chimichurri over the veggies and dip our bread into it.

We made it the other night and I was able to take a few photos to share with you.  We had a few tablespoons of the chimichurri left.  I saved it.  (If you know me you are not surprised by this). We had some left over pasta noodles in the fridge, so the next day I tossed them together and Shazam! a tasty lunch.  It's delicious on any meat, fish or vegetables.


borrowed from Simply Recipes

1 cup firmly packed fresh flat-leaf parsley, trimmed of thick stems
3-4 garlic cloves
2 Tbsp. fresh oregano leaves (can substitute 2 tsp. dried oregano)
1/2 cup olive oil
2 Tbsp red wine vinegar
1 tsp. coarse salt
1/4 tsp. freshly ground black pepper
1/4 tsp. red pepper flakes

Finely chop the parsley, fresh oregano, and garlic (or process in a food processor several pulses). Place in a small bowl.


Stir the olive oil, vinegar, salt, pepper, and red pepper flakes in a measuring cup.  Adjust seasoning to taste. Pour oil mixture over parsley mixture and stir until well combined.


Serve immediately or refrigerate.  If chilled, return to room temperature before serving.  Can keep for a day or two.

Flank Steak

Flank Steak
Salt and Pepper
Lemon juice
Worcestershire Sauce

Pat meat dry. Sprinkle generously with coarse salt and fresh ground pepper (on both sides).  Dash  Worcestershire Sauce and the juice of a lemon over it (on both sides).
Cook on heated grill over high heat to sear it.  Do not overcook it. 
Rich says the rarer the better.


Chimichurri is so simple.  It takes only a few minutes to make and yet it can transform a meal.

Which, by the way, simple, delicious recipes like this create somewhat of a problem in my life.  Being the tightwad that I am, and loving really tasty food it is hard for me to justify paying $25 for dinner, when it can be made simply at home for a fraction of the cost! And you get to have leftovers! (Not to mention you can do this while wearing your sweat pants).


Wednesday, September 5, 2012

Quick-to-Fix Favorites: from Icy Orange Juice to Croutons


WARNING: This is a quirky, random post.  The common denominator of all of these 4 recipes is that they are EASY, recipe-less and favorites!  You know when you try a recipe and it is so simple and great you just have to tell someone? I feel that way every time I make each of these.  I have a magnetic dry erase board on our refrigerator where I write foods I want to try, menus for the week and a running list of things I have made that I want to post on this blog to share with you.  These items have all been on the list for a while and I have been deliberating about how/when to share these simple treats.  I want you to try them! They aren't really recipes, but rather instructions. They are 5-minute-prep-kind-of-foods. WHO doesn’t love those?? – Icy Orange Juice, Sopas, Garlic Edamame and Homemade Croutons 

pour
Icy Orange Juice 
a childhood tradition that lives on in my house

I’ve had a long term relationship with Icy Orange Juice.  It was the special treat mom made when we had sleep overs and she would make homemade biscuit donuts and this special breakfast drink.  It's just a can of frozen orange juice concentrate and ice water blended together, but it makes a thick, icy, slushy orange juice drink.
blend


If you are my age, you might have grown up with Orange Julius shops in your world.  

There was one at the mall when I was a kid.  This is reminiscent of it, minus the milk…which you CAN add if you are going for a creamsicle type of treat.

What you need:  1 large can frozen orange juice concentrate, ice, water, a blender and a pitcher